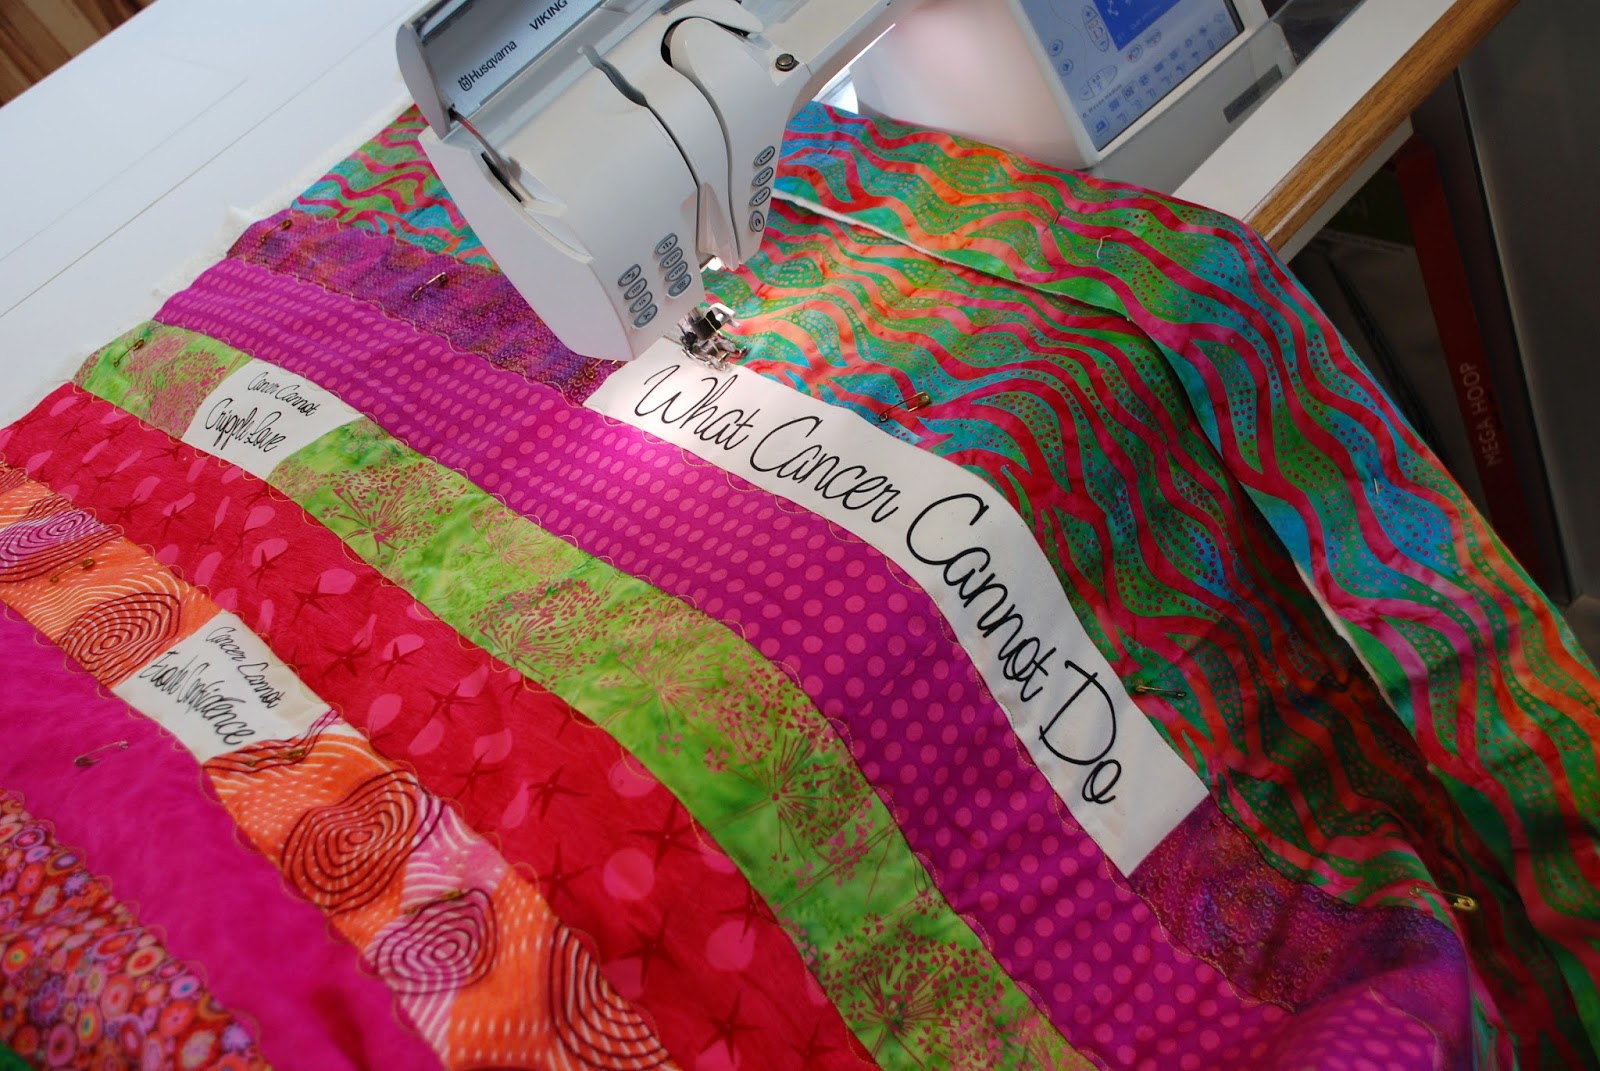
Dawn is my daughter-in-law....married to Jarrad.....who is currently going thru chemo for lymphoma. A couple of weeks ago my quilting friend, Valerie, gave me a panel of sayings that were all cancer related. I was trying to think of how I could best use the panel, as I loved the sentiments written there, and then it hit me.
Dawn! She has been so supportive of Jarrad while he is going thru his cancer treatments. And I know she loves words of encouragement. AND, I finally realized I had made several quilts for her boys and Jarrad had several quilts that I have made for him over the years. But Dawn had none! Horrors! giggle......well, that had to be rectified. Immediately.
I began pulling out fabrics in pinks and lime and all manner of bright colors, playing with them as I went along until I came up with a pleasing cacophony of wild pattern and color combinations.
This was the "title" of the panel. I cut strips from the various fabrics in the width of the panel's sayings. That made it super easy to determine how wide to make them. Then, as I sewed the sayings into the various fabrics, I staggered them so they would be sprinkled all over the quilt.
See? It was fun to play with the crazy patterns and colors and begin to sew them together in a pleasing display.
When all the strips were sewn together I added a wide border on 2 sides to make the quilt large enough to lay under and cover up with while watching tv. I was more concerned with making the quilt long enough as Dawn is almost 6' tall.
Once the quilt top was the width I wanted, I layered it with batting behind it and a colorful backing fabric that matched the wide borders. To quilt the three layers together, I simply stitched over each seam line with a wavy stitch that is built into my machine. Can you see the lime thread stitching?
I did this quilt a little different from other quilts I've made as the sayings are "sideways" on this quilt. They run up and down the long way of the quilt. I just thought it was more interesting that way. No one can accuse me of being afraid of mixing color and pattern, that's for sure! Ha!
On the center back of the quilt I used pink on pink dotted fabric to break up the wild fabric that matched the wide borders on the front. Then, I embroidered a label for Dawn. It's hard to read in the pic, but it says,"Feb. 2015 For my faithful and supportive daughter-in-law. All my love, Debbie"
Cancer doesn't just affect the person with the diagnosis. It affects every member of their family. And most especially their spouse and children. Dawn has been doing a remarkable job taking care of Jarrad all the while she is maintaining her normal routine with the house and two kids. And she is staying upbeat and supportive. That's a lot. And I appreciate how much she loves my son.
This quilt was long overdue. Now Dawn has something "girly", just for her, in a house filled with testosterone! ha! I hope Dawn enjoys snuggling under this quilt as much as I enjoyed making it for her.
Debbie
Quirky quilts, custom embroidery, memory quilts and really fun stuff. Contact Debbie @ 1-931-335-9493.
Showing posts with label Quilts for my Family. Show all posts
Friday, February 20, 2015
Tuesday, January 27, 2015
Jarrad's Quilt
For those of you who know me and my family well, you are already aware that our oldest son, Jarrad was recently diagnosed with lymphoma over Christmas. While I was in Florida with Jarrad I had my husband mail me an old quilt of Jarrad's that was in desperate need of repair. I needed something to do with my hands as I sat with Jarrad at different appointments and his first chemo. But first I need to give you some history behind the quilt.
My first quilting lesson was back in 1987. We were living north of Kansas City at the time in a little town called Parkville. Downtown Parkville was very quaint and had a few shops, one of them being a quilt shop. I was so excited after my first lessons and proceeded to make this twin sized quilt for Jarrad's bed.
Well, fast forward several years......Jarrad went in the Navy and unbeknownst to me he took the quilt with him. Trust me when I say that the Navy laundry was not kind to Jarrad's quilt. I believe it had bleach water thrown on it at least once, if not more often. And the binding had become nothing more than shreds from the rough laundering.
Fast forward several more years......now Jarrad is married with 2 boys and I spied the quilt folded neatly in a basket on the floor of their living room. The basket held several quilts I had made for Jarrad over the years and they got plenty of use covering the family while they laid on the couches and watched TV.
Three years ago I whispered to my daughter-in-law that I was "stealing" the quilt back....with the intention of repairing it and giving it back to Jarrad ready for another 25 years of use. Well, the quilt got put into a UFO(unfinished objects) bin and then we moved twice. Fast forward to this Christmas and I remembered the quilt lanquishing in a bin in my new sewing studio.
So, Joel sent it to me in Florida where I began making the necessary repairs. I'm not sure why, but somehow I had thought to save all the leftover pieces of fabric from when I originally made the quilt and they were all together in a plastic bag in one of my bins. Thank goodness I had them as I used those scraps to make new binding, an applique and a quilt label.
When I took my first quilting lesson, it was just to learn how to piece the front of the quilt together. They also taught me how to layer the front of the quilt with batting and then a piece of fabric on the back. This is called the quilt sandwich. Well, the sandwich needs something to "hold" it together. That is usually hand quilting(back then that was the only way to quilt) or you could put embroidery thread "ties" thru the three layers at regular intervals to hold the sandwich together.
I had "tied" his quilt, but the rough handling in the Navy all but destroyed those ties and the three layers were hopelessly flopping around. I knew it would take me way too long to hand quilt this quilt, so, I decided to do "big Stitch" which is something fairly new in the quilting world. It is still done by hand, but it goes much faster and is decorative and works well to hold the sandwich together.
This is what the "big Stitch" looks like from the back. As you can see, the quilt layers are now securely sewn together and the entire quilt will hold up much better to many more years of use. I altered red, cream and blue threads.......using number 8 Perle Cotton thread which sewed beautifully.
There were some areas of the quilt that had ripped and instead of trying to make the quilt perfect once again, I decided to highlight the age and distressing the quilt had taken on thru the years. Here I did a simple "X" around an area that had lost the cream and navy fabric. Who knows how that rip happened? But I think it adds to the charm and the "story" of Jarrad's quilt.
I do need to backtrack a bit. At some point during his Navy years, Jarrad brought the quilt home and I attempted to machine quilt waves on the border. I say attempted because that was before I knew anything about machine quilting. Now I cringe to look at my first try at what was a new art form at the time. Trust me when I say my machine quilting has come a long way from that first primitive attempt. But I am leaving it, as it is also a part of the history of the quilt as well as a history of the progression of my quilting skills.
Here is some more of my early attempts at machine quilting. Sigh......I was trying to make a center medallion. Oh, well.
Jarrad has become so involved in renovating VW buses and is in the middle of yet another renovation. I just had to make an applique of a VW bus in the hopes of putting a smile on his face as he uses this quilt during his chemo sesssions.
And I finally did what I should have done all those years ago......made a label for the back of the quilt giving it some identity for years in the future.
Here it is.....with all new "ties", red, navy and cream big Stitch, a new sturdier double binding around the quilt, a fun applique for the front and a label on the back. This was a labor of love and I pray it will bring comfort to Jarrad and that he will be able to feel my love as he lays under this during his recovery.
As I watched Jarrad trying to get comfortable during his first chemo session, I realized he was wishing for a more comfortable pillow. Ta-da.....I dug out a soft down pillow leftover from my home dec business and made a cover for it complete with the Bible verse I am reciting over and over during Jarrad's battle with cancer.
The quilt and pillow are going in the mail tomorrow so he will have it to use as he wishes. I'm so grateful to have sewing as an outlet to show my love and care for our son. This was a true labor of love that helped me feel like I was doing just a little something to ease Jarrad's suffering.
So glad I'm a quilter,
Debbie
My first quilting lesson was back in 1987. We were living north of Kansas City at the time in a little town called Parkville. Downtown Parkville was very quaint and had a few shops, one of them being a quilt shop. I was so excited after my first lessons and proceeded to make this twin sized quilt for Jarrad's bed.
Well, fast forward several years......Jarrad went in the Navy and unbeknownst to me he took the quilt with him. Trust me when I say that the Navy laundry was not kind to Jarrad's quilt. I believe it had bleach water thrown on it at least once, if not more often. And the binding had become nothing more than shreds from the rough laundering.
Fast forward several more years......now Jarrad is married with 2 boys and I spied the quilt folded neatly in a basket on the floor of their living room. The basket held several quilts I had made for Jarrad over the years and they got plenty of use covering the family while they laid on the couches and watched TV.
Three years ago I whispered to my daughter-in-law that I was "stealing" the quilt back....with the intention of repairing it and giving it back to Jarrad ready for another 25 years of use. Well, the quilt got put into a UFO(unfinished objects) bin and then we moved twice. Fast forward to this Christmas and I remembered the quilt lanquishing in a bin in my new sewing studio.
So, Joel sent it to me in Florida where I began making the necessary repairs. I'm not sure why, but somehow I had thought to save all the leftover pieces of fabric from when I originally made the quilt and they were all together in a plastic bag in one of my bins. Thank goodness I had them as I used those scraps to make new binding, an applique and a quilt label.
When I took my first quilting lesson, it was just to learn how to piece the front of the quilt together. They also taught me how to layer the front of the quilt with batting and then a piece of fabric on the back. This is called the quilt sandwich. Well, the sandwich needs something to "hold" it together. That is usually hand quilting(back then that was the only way to quilt) or you could put embroidery thread "ties" thru the three layers at regular intervals to hold the sandwich together.
I had "tied" his quilt, but the rough handling in the Navy all but destroyed those ties and the three layers were hopelessly flopping around. I knew it would take me way too long to hand quilt this quilt, so, I decided to do "big Stitch" which is something fairly new in the quilting world. It is still done by hand, but it goes much faster and is decorative and works well to hold the sandwich together.
There were some areas of the quilt that had ripped and instead of trying to make the quilt perfect once again, I decided to highlight the age and distressing the quilt had taken on thru the years. Here I did a simple "X" around an area that had lost the cream and navy fabric. Who knows how that rip happened? But I think it adds to the charm and the "story" of Jarrad's quilt.
I do need to backtrack a bit. At some point during his Navy years, Jarrad brought the quilt home and I attempted to machine quilt waves on the border. I say attempted because that was before I knew anything about machine quilting. Now I cringe to look at my first try at what was a new art form at the time. Trust me when I say my machine quilting has come a long way from that first primitive attempt. But I am leaving it, as it is also a part of the history of the quilt as well as a history of the progression of my quilting skills.
Here is some more of my early attempts at machine quilting. Sigh......I was trying to make a center medallion. Oh, well.
Jarrad has become so involved in renovating VW buses and is in the middle of yet another renovation. I just had to make an applique of a VW bus in the hopes of putting a smile on his face as he uses this quilt during his chemo sesssions.
And I finally did what I should have done all those years ago......made a label for the back of the quilt giving it some identity for years in the future.
Here it is.....with all new "ties", red, navy and cream big Stitch, a new sturdier double binding around the quilt, a fun applique for the front and a label on the back. This was a labor of love and I pray it will bring comfort to Jarrad and that he will be able to feel my love as he lays under this during his recovery.
The quilt and pillow are going in the mail tomorrow so he will have it to use as he wishes. I'm so grateful to have sewing as an outlet to show my love and care for our son. This was a true labor of love that helped me feel like I was doing just a little something to ease Jarrad's suffering.
So glad I'm a quilter,
Debbie
Tuesday, September 2, 2014
Just a Few More
Here's #29, Economy (?), aptly named because it was so straight forward a block to make, I guess.
And #30 is End of Day...kinda like a modified pinwheel.
Then we have #31, Evening Star. Ok, I can see that one.....I used kitty fabric for that block. But I really like #32 named Farmer's Daughter. What a pretty star!
Since yesterday was a holiday, I took some time to start something special and worked on an applique table runner for our new kitchen table. I love the batik fabrics that are used for the flowers and leaves and it was such a fun process.
First all the pieces get traced onto Steam A Seam and that gets finger pressed onto the reverse side of the batik. Then the fabric gets cut out on the traced lines and you are left with a perfect shape, ready to press onto your background fabric. It felt sooooo good to do something different from the Farmer's Wife blocks. And this Edyta Sitar pattern is really pretty.
Now I need to stitch around all the pieces as this is raw edge applique. Right now all the pieces are fused down after using Steam A Seam II Light. Then all I have to do is layer the runner with batting and a backing and quilt it. It will get a dark binding to finish off the whole project and I think the dark border will help it "pop" against our light table. Can't wait to see it completed! I'll show you pics when that happens.
Till then,
Debbie
Wednesday, August 14, 2013
The Icing on the Cake
The monster quilt was such a hit with Nate and I had a lot of leftover fabric........so, I decided to make a matching pillowcase to go with the quilt.
And since I had a few more silk triangles already made up, I made sure to put them front and center where he can touch them as much as he would like to. Don't you just love the little monster hands holding the letters of his name? Nate looks ready for a nap in this photo....
No time like the present to check out the snuggly quality of the pillowcase,
Grammy
And since I had a few more silk triangles already made up, I made sure to put them front and center where he can touch them as much as he would like to. Don't you just love the little monster hands holding the letters of his name? Nate looks ready for a nap in this photo....
No time like the present to check out the snuggly quality of the pillowcase,
Grammy
Monday, August 12, 2013
Little Monsters Quilt, Done and Delivered
I know it's been a long while since I posted here. We had a death in the family, our son joined the U.S. Air Force only to be medically discharged 8 weeks later(much angst involved in that one!), our house sold, our Tin Can Cabin sold and we moved all our belongings to a rental home, my mom took a terrible fall and is still recovering months later from fractures and other issues............and those are just a few of the things we have lived through this last 6 months. So, I apologize for such a lengthy space in between blogs.
Whew! But, all is calm now and I'm baaaack. Here are some pics of the previously much mentioned Monster Quilt, which I somehow got completed despite all our recent craziness.
I just love the bright colors and all the details in the monsters, the triangle border pieces and the quilting. The center panel has 12 monsters in amongst the hundreds of varying sized circles. Surrounding the panel are four different borders and then the large outside border is made up of strips of fabrics sewn together and then cut out as triangles and sewn to a wide white border. See the small triangles randomly placed around the quilt edges? More on those in a minute.
The monsters were so much fun to make. Choosing fabrics from my stash was a blast as I tried to capture a different personality for each little guy. Good thing I have lots of stash!
They all got topstitched in matching threads and their smiles were made using a tight zigzag in black thread.
Then after the quilt was "sandwiched" with backing and batting, I used "swirly" free motion quilting in between all the circles and monsters.
Here's a close up view of the multiple fabrics required to make up each triangle in the border. They were blanket stitched down in dark blue thread and then I used white thread to free motion stitch tight swirls in the white relief areas behind the triangles. Now THAT part took a really long time. You can see one of the three dimensional triangles I mentioned earlier peeking out of the upper left hand of the photo.
Jarrad and Dawn, our son and daugher-in-law were really excited to finally see the quilt in its completed state(it's their youngest son, Nate, who is the recipient of the quilt). Good grief, I've only been talking about finishing this thing for almost a year now!
This is one of the outer corners with layered circles stitched in spirals to hold the three layers of the quilt together. A darker bright blue anchors the quilt as the binding around the edges. And I couldn't believe my luck when I came across this circle fabric in my colors!!!!! It became the perfect fabric for the back of the quilt.
Nate likes to fondle soft fabrics to soothe himself as he falls asleep. So, I used some hand painted silk pieces I had in my stash and created three dimensional triangles and inserted them strategically around the quilt edges. They are so smooth and soft and he found them right away upon his first inspection of the quilt.
Wait'll you see the quilt I'm going to be working on for myself over the next few months. It's a real brain teaser. Until then,
Debbie
Whew! But, all is calm now and I'm baaaack. Here are some pics of the previously much mentioned Monster Quilt, which I somehow got completed despite all our recent craziness.
I just love the bright colors and all the details in the monsters, the triangle border pieces and the quilting. The center panel has 12 monsters in amongst the hundreds of varying sized circles. Surrounding the panel are four different borders and then the large outside border is made up of strips of fabrics sewn together and then cut out as triangles and sewn to a wide white border. See the small triangles randomly placed around the quilt edges? More on those in a minute.
The monsters were so much fun to make. Choosing fabrics from my stash was a blast as I tried to capture a different personality for each little guy. Good thing I have lots of stash!
They all got topstitched in matching threads and their smiles were made using a tight zigzag in black thread.
Then after the quilt was "sandwiched" with backing and batting, I used "swirly" free motion quilting in between all the circles and monsters.
Here's a close up view of the multiple fabrics required to make up each triangle in the border. They were blanket stitched down in dark blue thread and then I used white thread to free motion stitch tight swirls in the white relief areas behind the triangles. Now THAT part took a really long time. You can see one of the three dimensional triangles I mentioned earlier peeking out of the upper left hand of the photo.
Jarrad and Dawn, our son and daugher-in-law were really excited to finally see the quilt in its completed state(it's their youngest son, Nate, who is the recipient of the quilt). Good grief, I've only been talking about finishing this thing for almost a year now!
This is one of the outer corners with layered circles stitched in spirals to hold the three layers of the quilt together. A darker bright blue anchors the quilt as the binding around the edges. And I couldn't believe my luck when I came across this circle fabric in my colors!!!!! It became the perfect fabric for the back of the quilt.
Nate likes to fondle soft fabrics to soothe himself as he falls asleep. So, I used some hand painted silk pieces I had in my stash and created three dimensional triangles and inserted them strategically around the quilt edges. They are so smooth and soft and he found them right away upon his first inspection of the quilt.
Jarrad had to give the quilt a test run, making certain it was up to standard for Nate before taking it home. Ha! I think it passed the test.......
All I can say is that I don't think I have enjoyed making a quilt more than I did this one. Hats off to the designer, Kellie from Don't Look Now! in Melbourne, Australia for an awesome pattern. She has quite an imagination, wouldn't you say?Wait'll you see the quilt I'm going to be working on for myself over the next few months. It's a real brain teaser. Until then,
Debbie
Wednesday, January 30, 2013
Making Progress
Well, the Monster quilt is coming along nicely. I worked on it for 2 more days and finally the entire quilt top is completed! Here are some pics that show how the borders were created.
I cut strips of varying widths from all the fabrics left over that were used to make the circles for the center panel. Then, they were randomly sewed together and the seams pressed all to one side. I used the template from the instructions to cut triangles.....lots and lots of triangles, from the newly created strip fabric.
The triangles were evenly spaced along the white borders and pinned in place. Then I stitched them using a blanket stitch on the sewing machine.
Here's a peek at the quilt top with the borders attached. Whew! I need to backtrack here for a minute. Before attaching the wide borders with the triangles, I had to create the narrow borders. The green one on the left was no problem. The orange and red one on the right was easy also and just had to have the large blue ric-rac centered onto the red strip. The short end borders were another story, though.
The top border was a 2" white strip sewn onto a 1" red strip on one side and a 1" orange strip on the other. Then I had to cut out and apply 20 1" circles on the white strip.
The bottom border consists of 3-1" blue strips sewn with 2-1" strips in between. Wow, everything about this quilt takes time! I have to admit, though, that I have really enjoyed making this quilt. There's something fun about the challenge of a complex quilt that speaks to me. Now I just have to "sandwich" the quilt with batting and a fabric I found for the backing with, what else, circles all over it! Quilting it is another matter. I have absolutely no idea how I'm going to quilt this one. Wish I had a long arm quilter......sigh......someday, maybe.
Circle crazy,
Debbie
I cut strips of varying widths from all the fabrics left over that were used to make the circles for the center panel. Then, they were randomly sewed together and the seams pressed all to one side. I used the template from the instructions to cut triangles.....lots and lots of triangles, from the newly created strip fabric.
The triangles were evenly spaced along the white borders and pinned in place. Then I stitched them using a blanket stitch on the sewing machine.
Here's a peek at the quilt top with the borders attached. Whew! I need to backtrack here for a minute. Before attaching the wide borders with the triangles, I had to create the narrow borders. The green one on the left was no problem. The orange and red one on the right was easy also and just had to have the large blue ric-rac centered onto the red strip. The short end borders were another story, though.
The top border was a 2" white strip sewn onto a 1" red strip on one side and a 1" orange strip on the other. Then I had to cut out and apply 20 1" circles on the white strip.
The bottom border consists of 3-1" blue strips sewn with 2-1" strips in between. Wow, everything about this quilt takes time! I have to admit, though, that I have really enjoyed making this quilt. There's something fun about the challenge of a complex quilt that speaks to me. Now I just have to "sandwich" the quilt with batting and a fabric I found for the backing with, what else, circles all over it! Quilting it is another matter. I have absolutely no idea how I'm going to quilt this one. Wish I had a long arm quilter......sigh......someday, maybe.
Circle crazy,
Debbie
Tuesday, January 22, 2013
More Monster Quilt
It was months ago when I started to work on a quilt for our youngest grandson. I got as far as cutting out the monster faces and piecing them together. But then life got crazy and I had to put the quilt on the back burner. Well, I have a break from work for clients so I pulled the quilt out again and worked on it last week in earnest. Here's how far I got....
This quilt has a 39"X60" center panel that is literally covered with circles. Tons and tons of circles. The largest ones I drew out on the back of the fabric and cut out. But all the circles less than 4" I traced onto Steam A Seam Light II and ironed onto the back of all the fabrics, then cut on the lines to create perfect circles that just needed to be ironed onto the center panel.
I started laying out the medium sized circles after the large monster faces were in place. Then I filled in with the smaller circles. Holy cow there were a lot! I stopped to count them and ended up counting 425!!!
I thought I would never finish cutting them all out.
The next job was to iron the ones that had the fusible attached to their back. That held them in place so I could start the 3 day process of free motion stitching on each and every circle. Color by color....
Yes, that's a lot of different threads, isn't it?
Here's a view of the back and the stitching. After stitching around the larger circles, I cut away the white fabric to eliminate bulk after it's all quilted.
The final step for the inside panel was stitching the mouths of all the monsters. Now, on to the borders! Wait'll you see what they're like!
More to come,
Debbie
This quilt has a 39"X60" center panel that is literally covered with circles. Tons and tons of circles. The largest ones I drew out on the back of the fabric and cut out. But all the circles less than 4" I traced onto Steam A Seam Light II and ironed onto the back of all the fabrics, then cut on the lines to create perfect circles that just needed to be ironed onto the center panel.
I started laying out the medium sized circles after the large monster faces were in place. Then I filled in with the smaller circles. Holy cow there were a lot! I stopped to count them and ended up counting 425!!!
I thought I would never finish cutting them all out.
The next job was to iron the ones that had the fusible attached to their back. That held them in place so I could start the 3 day process of free motion stitching on each and every circle. Color by color....
Yes, that's a lot of different threads, isn't it?
Here's a view of the back and the stitching. After stitching around the larger circles, I cut away the white fabric to eliminate bulk after it's all quilted.
The final step for the inside panel was stitching the mouths of all the monsters. Now, on to the borders! Wait'll you see what they're like!
More to come,
Debbie
Monday, October 29, 2012
Forgot This One
Somehow I forgot to post pics of the T-shirt quilt I made for Jeremy using his karate and quotes shirts. He has been sleeping under it ever since I made it, so, I guess he must really like it! It is a queen size with black borders, cream borders, and "karate chop" quilting. At least that's what I called it because it looked like someone knocked my arm as I was quilting it on the longarm machine.
Here's a portion of the "karate chop" quilting.
Molly just had to get in this shot of the whole quilt.......what a ham!
I decided to put some of his special karate shirts on the back. The quilt is nice and heavy and should help to keep him warm in South Dakota this winter. And it makes me feel good that he'll be reminded of how much his mom loves him as he drifts off to sleep each night.
Missing him already,
Debbie
Here's a portion of the "karate chop" quilting.
Molly just had to get in this shot of the whole quilt.......what a ham!
I decided to put some of his special karate shirts on the back. The quilt is nice and heavy and should help to keep him warm in South Dakota this winter. And it makes me feel good that he'll be reminded of how much his mom loves him as he drifts off to sleep each night.
Missing him already,
Debbie
Thursday, October 4, 2012
Don't Look Now
Yup, Kellie at Don't Look Now in Melbourne, Australia is responsible for the monsters invading my sewing room over the last couple of weeks. I saw her quilt pattern recently and it was one of those times that I had to buy it because it was so darn cute. Our youngest grandson, Nathan, is going to be the recipient of this quilt and I'm anxious to complete it to see how it turns out.
But, OH, how many pieces it has! Good grief, I think Kellie is a sewing masochist......there are so many circles and each one has to be cut out individually.......from different fabrics.........in different sizes........in increments of 1/8"! Yikes!
You'll see what I mean as I unveil portions of the quilt over the next few weeks. For now, here's a sneak peek at the monsters.
The shapes were traced onto Steam A Seam Light2, then ironed onto the back of the fabric. Then the shapes are cut out on the drawn lines.
The shapes are put in place over the original pattern, which is underneath a piece of teflon pressing cloth so I can press the shapes together using the Steam A Seam as "glue". The shapes can then be removed as a whole after they cool and placed wherever I need them and they don't stick to the teflon sheet.
The whole monster is then positioned over the colored circle and the pieces are zig zag stitched using matching thread.
Are you still with me? These 12 monsters took me almost 2 days to cut, iron, stitch and encircle! And, I'm just getting started!
The only thing left to do on all 12 is to stitch in their mouth shapes. I think I'll use a narrow satin stitch for that, but first I have to draw on their smiles.
They're kinda cute little guys, don't you think? Wait'll I show you what's next!
Stay tuned,
Debbie
But, OH, how many pieces it has! Good grief, I think Kellie is a sewing masochist......there are so many circles and each one has to be cut out individually.......from different fabrics.........in different sizes........in increments of 1/8"! Yikes!
You'll see what I mean as I unveil portions of the quilt over the next few weeks. For now, here's a sneak peek at the monsters.
The shapes were traced onto Steam A Seam Light2, then ironed onto the back of the fabric. Then the shapes are cut out on the drawn lines.
The shapes are put in place over the original pattern, which is underneath a piece of teflon pressing cloth so I can press the shapes together using the Steam A Seam as "glue". The shapes can then be removed as a whole after they cool and placed wherever I need them and they don't stick to the teflon sheet.
The whole monster is then positioned over the colored circle and the pieces are zig zag stitched using matching thread.
Are you still with me? These 12 monsters took me almost 2 days to cut, iron, stitch and encircle! And, I'm just getting started!
The only thing left to do on all 12 is to stitch in their mouth shapes. I think I'll use a narrow satin stitch for that, but first I have to draw on their smiles.
They're kinda cute little guys, don't you think? Wait'll I show you what's next!
Stay tuned,
Debbie
Subscribe to:
Posts (Atom)