Monday, October 29, 2012

Forgot This One

Somehow I forgot to post pics of the T-shirt quilt I made for Jeremy using his karate and quotes shirts.  He has been sleeping under it ever since I made it, so, I guess he must really like it!   It is a queen size with black borders, cream borders, and "karate chop" quilting.  At least that's what I called it because it looked like someone knocked my arm as I was quilting it on the longarm machine.
Here's a portion of the "karate chop" quilting.

Molly just had to get in this shot of the whole quilt.......what a ham!

I decided to put some of his special karate shirts on the back.   The quilt is nice and heavy and should help to keep him warm in South Dakota this winter.  And it makes me feel good that he'll be reminded of how much his mom loves him as he drifts off to sleep each night.

Missing him already,
Debbie

Friday, October 26, 2012

Indian Rocks Christian School Quilt

If you've been reading my other blog you will know why I haven't been doing much sewing this past couple of weeks.   But I'm back at it again and this week I took 50 hand painted blocks from the fourth grade class of Indian Rocks Christian School and pieced together a quilt for them.   Each year the fourth grade art class does this project and this is the second year I have turned their blocks into a quilt.   Last year's quilt won a blue ribbon at the Florida State Fair!

Each year the quilt is auctioned off at the Fall school fund raiser and the buyer is usually a parent of one of the children that helped paint the blocks.  I hope this year the quilt helps to raise a lot of funds for the school.  Last year I arranged the blocks so it was more of an art quilt, but this year I choose to arrange them symmetrically with the four large blocks in the corners, the map of the U.S. in the center and the state flag blocks filling in between them.
I'd also like to say a big thanks to Robin, the art teacher who organizes all of this and who so graciously works with me on this project.  She does all the leg work and makes my job a lot easier because then I can concentrate on just doing the sewing.
Every quilt needs a label as the finishing touch and to help document a little history of the quilt.  I couldn't believe I had this fabric with a dark navy field and small white stars in my stash.   It was the perfect material to frame the label and I also used it as the binding around the quilt.

Ta-da!   Done!
Debbie

Saturday, October 13, 2012

Monograms, Easy Peasy

Ha!    It only took an hour to program this new monogram.   Unfortunately, my learning curve on the computer can be really long!   My old sewing buddy, Barb, is visiting from Alabama and she asked if I could do some monogramming for her as her machine won't do it.    We thought it would be a great way for us to do what we used to call "spend the day", which meant we would get together at one of our houses and paint, sew, or garden all day long.

Barb has been busy sewing and painting and "nesting" at her new house in Alabama since moving there 3 years ago.   One of the last projects for her is making a bolster pillow for her bedroom.    That's what the monogram above is going to be used for.

In between all her projects at her own house, she is helping a friend up there to redecorate her home.    This monogram is for Andrea's bedroom and will be a pillow to match the soft teals and whites in the room.

Wow!   I wonder how many hours Barb and I racked up sewing together over the years?   It's a lot, I know that much!   We sure had fun together this week, too.   Even when we haven't seen each other for months, it's like riding a bike; we just fall into the same familiar rhythm of sewing and chatting.

It's good to have a sewing buddy,
Thanks, Barb, for visiting!
Debbie

Monday, October 8, 2012

Le Fleur

Sewing is fun, but so is scrapbooking, needlepoint and knitting.   Lately, I've been doing a lot of knitting and wait till you see what I played with this weekend.    I took a class at Flying Needles and you'll see the final results in a couple of weeks, but here is a sneak peek at a work in progress.

 I know, I know, it just looks like a blob of yarn right now.  You should see the directions!   Holy cow!  Well, the "blob" will eventually have 6 petals and is going to be a flower.  The black blob in the middle is going to be the center of the flower with stamens and the stem is lime green but hidden by the petals.
There was a lot of increasing and "knit yarn in front and back" in order to get the ruffles.   When the last petal is knitted, the whole thing gets felted in the washing machine with hot water and it shrinks up and the wool stitches get matted together and it shrinks.   When it's dry, the flower can be pinned on a jacket or a purse or whatever you want!    I'm excited to see it completed.  

More pics to come,
Deb

Thursday, October 4, 2012

Don't Look Now

Yup, Kellie at Don't Look Now in Melbourne, Australia is responsible for the monsters invading my sewing room over the last couple of weeks.   I saw her quilt pattern recently and it was one of those times that I had to buy it because it was so darn cute.  Our youngest grandson, Nathan, is going to be the recipient of this quilt and I'm anxious to complete it to see how it turns out.

But, OH, how many pieces it has!   Good grief, I think Kellie is a sewing masochist......there are so many circles and each one has to be cut out individually.......from different fabrics.........in different sizes........in increments of 1/8"!   Yikes!

You'll see what I mean as I unveil portions of the quilt over the next few weeks.  For now, here's a sneak peek at the monsters.
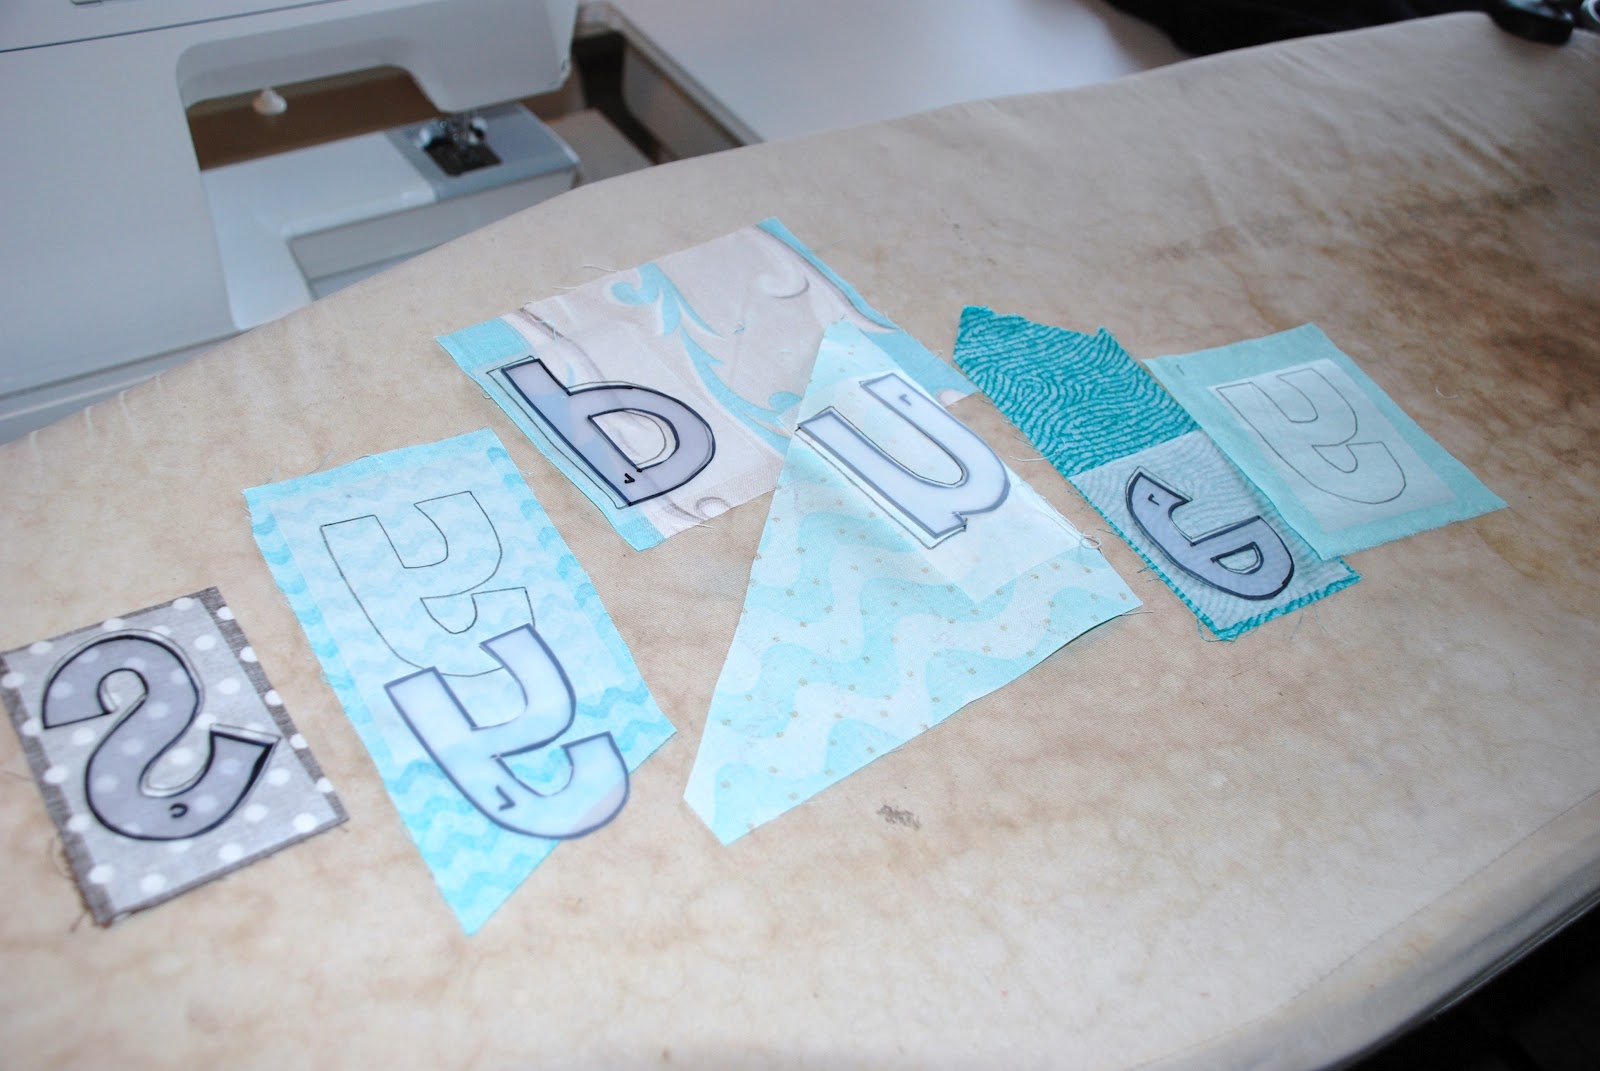
The shapes were traced onto Steam A Seam Light2, then ironed onto the back of the fabric.  Then the shapes are cut out on the drawn lines.
The shapes are put in place over the original pattern, which is underneath a piece of teflon pressing cloth so I can press the shapes together using the Steam A Seam as "glue".   The shapes can then be removed as a whole after they cool and placed wherever I need them and they don't stick to the teflon sheet.
The whole monster is then positioned over the colored circle and the pieces are zig zag stitched using matching thread.
Are you still with me?    These 12 monsters took me almost 2 days to cut, iron, stitch and encircle!   And, I'm just getting started!
The only thing left to do on all 12 is to stitch in their mouth shapes.  I think I'll use a narrow satin stitch for that, but first I have to draw on their smiles.
They're kinda cute little guys, don't you think?   Wait'll I show you what's next!  

Stay tuned,
Debbie

Monday, October 1, 2012

Pajama Monday

Hey, I think I just invented a new holiday........Pajama Monday!   Wouldn't you like that?   I know I do and that's exactly how I spent my Monday...........in my jammies..........sewing...........and drinking cappuccino.
I've been gradually making a mini-quilt for each month of the year and now have 7 done.   They hang from a cute metal holder that is up at the river and helps me remember what month it is!  ha!

I decided today was a great day to sew something for myself, as all my work for clients was completed.   It's so rare that I can spend an entire day sewing whatever I want to and I thoroughly enjoyed every minute of it.   I even got to use my new toy, the Sashiko machine.   It's amazing how pretty the stitches are and how much they look like hand quilting.   

First I used a blanket stitch to go around all the letters in black thread, then I straight stitched around the acorn.   I used matching threads to "draw" veins on the leaves which held them in place on the quilt.   Then I used the Sashiko to outline everything.  Oooooooo, what fun!

So now I have October and November completed.  
Um, yeah, I still need to read the manual every time I put the bobbin in, and adjust some of the stitching.   But the more I use the machine, the more comfortable I am getting with it.  One thing I realized today, I need more bobbins.  That's on my list of things to buy this week.

I took the advice of the ceramic sign that sits on top of my sewing room tv.  Can't wait to do it again, maybe next Monday?

Finally dressed,
Debbie


Thursday, September 27, 2012

Seminole Chiefs?

A couple of years ago a client came into my shop and asked if I could embroider her aprons for her.   On the garnet colored apron she wanted "Chief" in gold, the colors of the Florida State Seminoles.   On the bright blue one she wanted "Chief of Chiefs" in orange(if my memory serves me correctly), the colors for Florida Gators.  We had a good laugh about it and I finished the work for her and didn't give it another thought.

Well, quite a few months later she approached me again and asked me to embroider "Chiefette" for her niece.   A little while later she brought in another apron and I embroidered "Apprentice Chief" for her niece's boyfriend.   Apparently he was "applying" for the job of fitting into the family........more giggles.

Now, this week, the same woman came to me and I embroidered "Lieutenant Chief" on a black apron.  She explained that the "Apprentice" and the "Chiefette" were getting married and he had now graduated to Lieutenant in the family's eyes.   Pretty funny!    I can't wait to see what she brings me next.

Unbiased,
Debbie

Tuesday, September 25, 2012

Copycat

I honestly don't think I ever come up with a single original idea on my own.   Ok, maybe it happens on occasion.   What I am good at, though, is taking someone else's creation and revamping it and making it my own.   If you follow my other blog, www.threadsofmind.blogspot.com , you probably read how I'm hooked on Pinterest.   Below is the start of my copycat version of pillows I saw on Pinterest.....these are so fun that I think I'll be making a lot of them!  

For Jackson's pillow, I cut up some old jeans in my stash to be used for the pillow front.   I added simple letters in various red fabrics and zig-zag stitched them to the jeans.
 A simple lapped closure in two different red fabrics makes it easy to remove the pillow for laundry day.

Sydney's pillow matches her pretty new bedroom, too, only her colors are brown and teal. 
 The letters were traced in reverse on Steam A Seam Lite2, ironed onto the back of the fabrics and cut out on the lines.   They can be placed on the pillow front and repositioned until you like the placement, then simply iron for 5 seconds to hold them in place for stitching.
 For her pillow I straight line stitched instead of zig-zag since the background fabric was kinda busy.
 The back of her pillow is also a simple lapped construction.
And here is the finished product!   Can't wait to make more of these because they are a great way to use "stash" fabrics and the design opportunities are endless.   I'm going to try this same technique on the hem of pillowcases next.

Stitchin' again,
Debbie


Sunday, September 16, 2012

'Tis the Season.......Almost

I know, it seems like summer is still going strong and here I am bringing up Christmas.  But you know that if you are a crafter, and you intend to have completed, handmade presents under the Christmas tree, you had better get started pretty soon!

For myself, I embroidered a funky Florida-style tea towel for my kitchen.   Love the bright tropical colors and the font was fun, too.   Especially the flip flop for the "I" and the palm tree for the "R".  This embroidery was purchased from Embroidery Library online.

These towels were applique and I made them for our kitchen at the river.   They are a little more rustic and fit in there really well.   They are from Art to Heart by Nancy Halvorsen and the book was "Peppermint and Holly Berries".   Really cute designs.   Nancy always does a nice job and I really like her easy to follow instructions.


And then there is the monthly mini-quilt that I made for up at the cabin.   I still have a few more months to complete so I have all 12, but at least now I am ready for Christmas up there!   This is another Nancy Halvorsen book entitled "Count on It".   You may have to "double click" on the pics to see the details like the hand stitching around the appliques.

More projects to come,
Deb

Friday, September 14, 2012

Ottoman Redux

Found this little beauty at a house estate sale a couple of weeks ago.   It was the perfect size for the continuing remodel project at a friend's house.    Now it just needed a little updating with a quick slipcover.   Simple lines call for simple solutions, right?


The blue leather was just fine but didn't fit in with the decorating scheme so it received a new "dress".   The castors on the bottom will make it handy and it's just the right height to rest your feet while seated or maybe to put a tray on it to become a makeshift coffee table.

 
The ottoman goes with this chair.    Remember this one?   Whew!   One more project completed!
 
 
Working my way down my list,
Debbie

Thursday, September 13, 2012

New Toy


Yes, I have a new toy.  Actually, it's a new sewing machine to add to my arsenal in the studio.   It's called a Sashiko machine by Baby Lock.   Sashiko is the Japanese term for hand quilting and it has been done in Japan for centuries.   Only they used the hand stitches to layer fabrics on garments, rather than quilts for the bed.   There are many traditional sashiko (quilting) designs to copy, but that's not why I got this machine.


It truly gives the look of hand quilting to whatever you are stitching on.   Have you ever heard of a hand-picked zipper?    In haute couture clothing, the seamstress will stitch tiny stitches on the outside of the fabric surrounding the zipper after it has been sewn into the garment.   It's a beautiful treatment that is rarely seen today and is difficult to master the tiny, even stitches, and now it can be accomplished with the Sashiko machine.  I love that the stitch length can be adjusted from very small to quite large, and the space between the stitches can also be adjusted as well, so the variations are almost endless.


Not to mention the quilts I can embellish with the look of hand quilting without the months of hand stitching, which is usually not practical.   It's also a way to embellish clothing with the look of hand stitching as a decorative element.   Ohhhhhh, the possibilities are almost endless!   

Hopefully I will have some projects to show you in the near future utilizing this new technology.
  
Can't wait to play,
Deb

Wednesday, September 12, 2012

Adorable Travel Bag

Have you noticed that the airlines are getting stricter about your carry-on luggage?    Your carry-on has to have the ability to slide under your seat and cannot exceed certain dimensions.    Wouldn't you know, all the bags I wanted to use when I was going on a trip were too big on at least one of the dimensions the airlines posted on their website.  No problem!   Time to make one...

This is Annette's version at the store

Thanks to Annette Fly, who designed this bag at Keep Me In Stitches in Tampa, the solution was an easy one.   Her design is clever, fun, really practical and fit the bill for me.    I used my new monogram software to embroider my initials on the front panel of the bag and added a few extra pockets to the inside. 

                                                             And this is my version
 

 One of the pockets holds my I-Pad, another the power charger.   My camera and purse fit easily inside the bag and another pocket made it easy to have my boarding pass ready for the flight attendant.  I added a tab with a heavy duty snap to hold the bag shut for times I had to place it under the seat. 
                                                    Love all the pockets for organizing
 

And each side has a pocket that holds bottled water
 

This bag is so cute I think I may have to make another!    And I sure have had a lot of compliments on it, too.  Thanks, Annette, for all your tips and tricks that bumped the construction up a couple of notches.   I'm looking forward to designing the next one.

Sew Happy,
Debbie

Tuesday, September 11, 2012

Market Bags

A client recently brought me a project that presented some unusual problems to solve.   She is a knitter and made some cute market bags which were very roomy and had two handles.   The problem was that as soon as anything was put in them, they would stretch like crazy.   She wanted to have them lined.

Here's the problem:   How do you sew a fabric lining to a chunky hand knitted bag?   Very carefully!  Ha!


As these were going to be gifts, she wanted to have them embroidered, so I did that after coming up with a pattern to fit inside the bags.   They have a square bottom which presented a few issues but I think I got it all worked out.


The handles stretched anytime the least amount of weight was put inside the bag, so I decided the lining had to be attached to fabric that also lined the knitted handles.  NOW it's sturdy!


I used a blue thread on top and a pink thread in the bobbin and a large zig-zag stitch to attach the cloth handle to the knitted handle.   It was slow going and the knitting kept getting caught in the sewing machine foot, but I finally made it work.


And this is what the inside looks like when it was all sewn.  The fabric is a nice heavy duck and will wear well and I think these bags will last a long time.


And here is the navy bag with yellow-gold lining.  Nice and sturdy.

 
Wait'll we show this to the girls at Flying Needles!   They have all been asking me if I could line their bags........looks like we have a plan now.
 
Bag Lady,
Debbie


Monday, September 10, 2012

Grandma's Flower Basket

How many of you have quilt "tops" tucked away somewhere in a closet, drawer or trunk?   You know, a family member cut and pieced together hundreds of pieces of fabric into a design and created the beginnings of a quilt.   Then, the family member died or the top just got lost in the shuffle of everyday life and never got turned into a completed quilt.

Well that happened to a family friend of ours.   When I was approached about completing the quilt I was a little hesitant because I wanted to be sure to finish the quilt the way the quilter would have wanted it quilted.   When the quilt came to me it had been pinned for years with pins that had deteriorated and rusted and left rust stains on the quilt itself.   I was dismayed.

 
The first thing I did was to remove all the pins and check to see if any repairs had to be made. Since the quilt already had the batting and a backing in place, I could move on to designing a quilt stitch pattern in keeping with the era of the blocks on the quilt. 
 
 
 I decided that all the lavender and white checkerboard blocks would be stitched with simple parallel lines of  stitching and the basket blocks would be outline stitched.  

I really like how the stitching looks on the plain white backing of the quilt. 

 The parallel lines of stitching look really cool along the four sides of the quilt where I stitched the "on point" squares into the four borders.


The quilt got a good long 2 day soak which removed most of the rust and stains and brightened up the white fabric that had yellowed a bit in storage.   Even though a few spots remained, the owner of the quilt was so thrilled to receive a completed quilt back into her arms.  


I must say, I felt pretty good about how it turned out and was so happy to finish what was started a long time ago by a kindred spirit, another quilter.

Keep on Stitchin',
Debbie